Installation
ReviewNB application is distributed as a docker image via Quay. Once your on-prem request is approved, we create a private docker image for your use & grant you access to it.
You can use deployment tool of your choice to run the docker image. Below, we show a simple way to run the docker image from command line.
Note
Running docker image from the command line on a single instance works well for small to moderate installations. For larger deployments (>250 concurrent users) we recommend running ReviewNB in a cluster with container scheduling platforms such as Kubernetes, Docker compose, AWS ECS etc.
Hardware
ReviewNB can pretty much run on any hardware. The only real requirement is to have at least 8GB of memory. Go higher on memory if your notebooks tend to be larger or you are expecting lot of concurrent users.
Prerequisite
Docker should be installed, see the official installation docs
Credentials to pull your private docker image from Quay. You should’ve received it in registration email. If not, write to us at support@reviewnb.com
Following SMTP server credentials are required. This is to notify users when there is a new comment on their notebooks or somebody replies to a conversation. You can use the same SMTP settings that you are using with GitHub Enterprise or any other SMTP server you might have.
EMAIL_HOST: URL of SMTP server
EMAIL_PORT: Port number of SMTP server (defaults to port 587 if none specified)
EMAIL_HOST_USER: Username to authenticate with SMTP server
EMAIL_HOST_PASSWORD: Password to authenticate with SMTP server
SENDER_EMAIL_ADDRESS: Email address of the sender e.g. no-reply@<your-domain>.com
Run the image
Login (via docker CLI) to Quay docker registry with the credentials we sent you via email.
$ docker login -u="<username>" -p="<password>" quay.io
Pull the docker image. Image name & tag would also be available in the registration email we sent you.
$ docker pull quay.io/reviewnb/<your-company-name>:<reviewnb-version>
Run the docker image. Substitue all --env variables with your own values as explained in the table below this command.
$ docker run --detach \
--publish 443:8000 --publish 80:8000 \
--restart always \
--env GITHUB_APP_ID="1" \
--env GITHUB_CLIENT_ID="Iv1.5a6123881f61e84c" \
--env GITHUB_CLIENT_SECRET="2c40dbe73d8rdg3b7c37fbbab5d376b174b53deb" \
--env GITHUB_BASE_URL="https://github.corp.your-company-domain.com" \
--env GITHUB_APP_URL="https://ghes.nurtch.com/github-apps/reviewnb-for-nurtch" \
--env REVIEWNB_BASE_URL="https://reviewnb.nurtch.com" \
--env DB_URL="postgres://username:pwd@host:5432/database" \
--env EMAIL_HOST="<your-smtp-server-url>" \
--env EMAIL_PORT="<your-smtp-server-port>" \
--env EMAIL_HOST_USER="<your-smtp-server-username>" \
--env EMAIL_HOST_PASSWORD="<your-smtp-server-password>" \
--env SENDER_EMAIL_ADDRESS="no-reply@<your-domain>.com" \
--env TEST_EMAIL_ADDRESS="<email-address-on-which-test-email-will-be-sent>" \
--env GITHUB_APP_PEM="-----BEGIN RSA PRIVATE KEY-----\nMI<really-long-pem-key>Z9huMC\n-----END RSA PRIVATE KEY-----\n" \
quay.io/reviewnb/<your-company-name>:<reviewnb-version>
This will download the image, start a container and publish ports needed to access the application. The container will automatically restart after a system reboot.
Source for environment variables,
--env variables |
Source |
|---|---|
|
Endpoint at which your company’s GitHub enterprise instance is running
If you are using ReviewNB with github.com then use
https://github.com |
|
Endpoint at which your self hosted ReviewNB will be running
If you are using ReviewNB with self hosted GitHub Enterprise (GHE) then
REVIEWNB_BASE_URL should have same top level domain as GITHUB_BASE_URLE.g. If you’re GHE is running on github.prod.company.com then
REVIEWNB_BASE_URL should also end with .company.com |
|
|
|
|
|
These are SMTP server settings required to send emails when a new comment
is posted on a notebook. You can use any SMTP server.
SENDER_EMAIL_ADDRESS is used as a from field for each email.
Make sure the sender email is acceptable to your SMTP server.
|
|
Use your own email address. A test email will be sent on this address. |
|
Set this to “0” if your SMTP server does not support TLS protocol. |
Verify Installation
Visit the endpoint where container is running (endpoint could even be an ip address for the sake of verification). You should see the login page without any errors on it. Do not login just yet, you can login after adding HTTPS suppport (last step below).
Troubleshooting
If login page doesn’t show up or the page indicates any preflight errors, most likely you haven’t set all the environment variables properly.
If all environment variables are set correctly and you’re still seeing errors, look at container logs (
docker logs <container-id>) to see if logs are complaining about something.If still not resolved, reach out to support@reviewnb.com
Domain Name & HTTPS Support
At this point, the application is simply running on port 80 and 443 on an instance. You should,
Add a load balancer with HTTPS support in front of the instance. The exact steps depends on the infrastructure you are using. E.g. Create ALB for container running on AWS EC2
Add a CNAME entry that points
REVIEWNB_BASE_URLto your load balancer. That way the application is accessible on easy to remeber endpoint (e.g. reviewnb.xyz-company.com)
Once the HTTPS support is added, you can set an additional environment variable SSL_REDIRECT=1 to redirect all HTTP traffic to be served via secure HTTPS protocol.
Verify Test Email
Once you see the login page without any errors, you should visit /send_test_email as shown below.
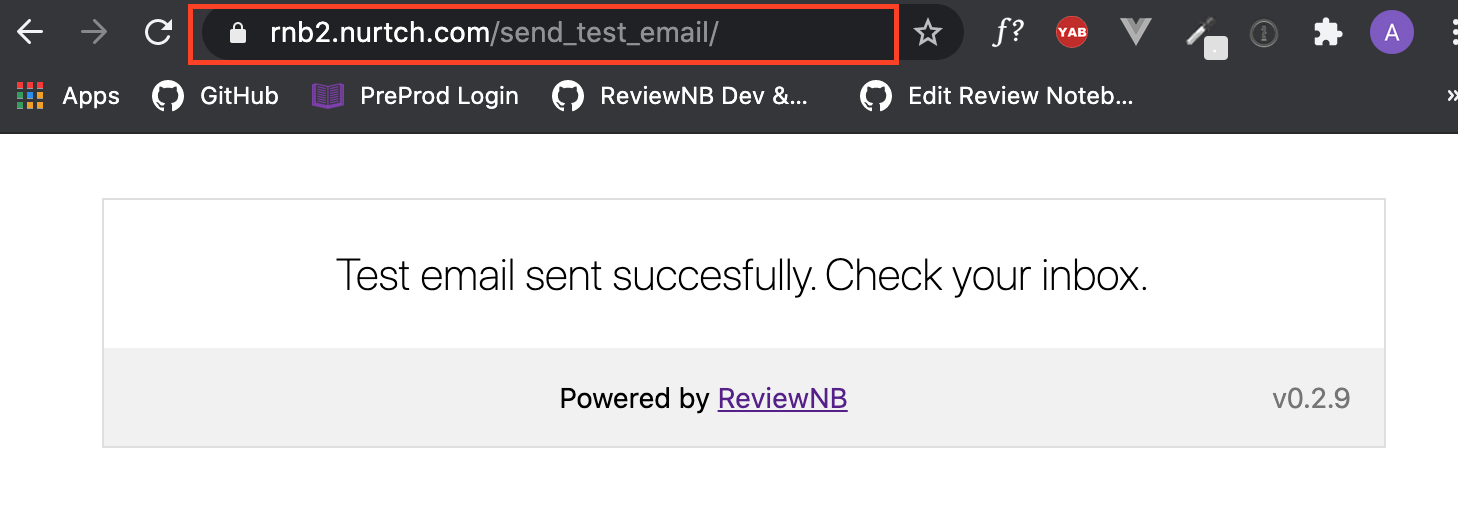
You must receive a test email on TEST_EMAIL_ADDRESS you specified.
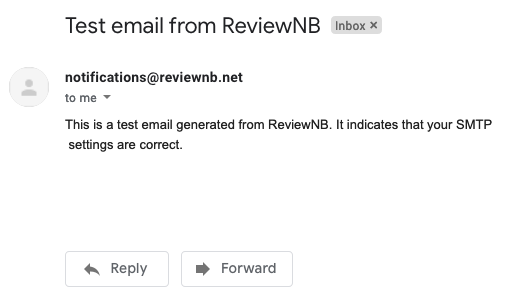
If you don’t receive test email,
Check container logs (
docker logs <container-id>) to see if there are any errorsCheck your SMTP server logs to see if email failed to send for some reason
If still not resolved, reach out to support@reviewnb.com
Verify Bot Comments
You must perform this verification step to make sure all features are working as expected,
Note
Please do not skip any of the verification steps above. All steps are essential for a successful installation.
That’s all! You have successfully installed and verified ReviewNB application & it’s ready for use. 🥳
Optional Tips
Some handy tips for ReviewNB users,
All notebook, repository, commit, and PR URLs on ReviewNB intentionally have the same URL structure as that of GitHub. So you can use dynamic bookmarks to quickly jump back & forth between ReviewNB & GitHub.